Search This Blog

Friday, November 29, 2013

Map User Properties in SharePoint User profile service

We can map SharePoint user profile properties to Active Directory Data. By doing that while synchronizing the data from Active directory to SharePoint, configured properties will be automatically associated with User Profile properties.
To sync AD DS properties with User Profile properties,
Navigate to SharePoint Application Management page and click on Manage Service Applications link.


Select User Profile Service application to navigate Manage User Profiles page.
Click on "Manage User Properties" link in People section to navigate "Manage User Properties Page".
Select any property, Right click and click on Edit.

To remove the existing mapping, Click on Remove button in "Property Mapping for Synchronization" section. To add new mapping, In the Add New Mapping section in "Source Data Connection" list, Select Data connection link in directory service to map the user profile property. Specify the attribute in Attribute box and click on Add button.
Click on Ok to save the configurations. We can map the user properties to AD by repeating the above steps.

Thursday, November 28, 2013

Microsoft Virtual Academy Live Event(Friday, 13 December 2013)>>Developing SharePoint Server Advanced Solutions

Content type hub in SharePoint allows accessing content types from one site collection to other and Managed metadata service. Once we create the content type hub URL we cannot change it through UI. We can change the content Type Url by using PowerShell commands.
 To change the content type hub URL initially we have to identify the URL and need to identify the managed metadata service. Once we got the URL, need to run following commands in SharePoint Management shell with Admin privileges.
Set-SPMetadataServiceApplication -Identity "Service Application Name" -HubURI "Hub URI"
Set-SPMetadataServiceApplication -Identity "Managed Metadata Service Name" -HubURI "Content Type Hub URL"
After running these commands it will asks us to confirm the URL change. Click on Y to confirm URL updation.


Wednesday, November 27, 2013

Microsoft Learning!!

Configure Data Retrieval Service in SharePoint 2013

Configure Data Retrieval Service in SharePoint 2013

In SharePoint, Data retrieval service implements data-binding feature. This allows communicate data consumers and data sources. We can install/run data retrieval service in SharePoint running machines. SharePoint includes the default set of data retrieval services to work with SharePoint lists, OLEDB and XML data sources. Data bound webparts, Spread sheets can use data provider services to get the data from data sources. We can configure data retrieval settings in SharePoint Central Administration.
We can configure data retrieval settings in SharePoint 2013 by using following steps,
Navigate to Application Management in SharePoint central Administration and click on Configure the data retrieval service.
We'll navigate to Data Retrieval Service configuration page. In Configuration page, We have to choose the web application. To configure the settings for farm level, select "Global Settings" in web application drop down or we want to configure web application level, we can choose the web application. By default it is "Global Settings".
To enable the data retrieval service we have to check "Enable these data retrieval services" check box. 
We can specify the maximum number of kb's allowed in response from OLEDB data source in Response size limit box in Limit Response Size section. By default it is 10000.
By checking "Enable update query support" check box in Update Support section, queries will support for updating. We need to enter the number of seconds that the data retrieval service will wait to get a response from a data source in Data Source Time-out section Request Time out box. By default this value is 30 sec.

By checking "Enable these data source controls" check box in "Enable Data Source Controls" section we can enable the queries to the data source types. Click on Ok button to Save the configuration settings.


Tuesday, November 26, 2013

Create and import a thesaurus in SharePoint Server 2013

Why synonyms matter when you search
People are different. Not only do we look and dress differently, but when we communicate, we use different words to describe the same thing. The same applies to how we search for information. In a search engine, you might enter “flower image,” whereas I might enter “flower picture” or “flower photo.”  Even though we used different phrases, we were searching for the same information. 


And then there are acronyms. Acronyms are especially popular in organizations, but when you search for information, this can be a challenge. For example, if you want to see the Monthly Sales Report, you’ll most likely search for it by using the terms Monthly Sales Report. However, the people that create this report might use the acronym MSR. So, when you search for Monthly Sales Report, no search results are returned. 


In SharePoint Server 2013 you can easily create and upload a thesaurus that contains synonyms for search phrases and acronyms. In this blog post, I’ll use a simple example to show you how you can do this.
Imagine that you have two documents in a library:
·         A Word document titled “Coffee.”
·         A PowerPoint document titled “Cup of Joe.”

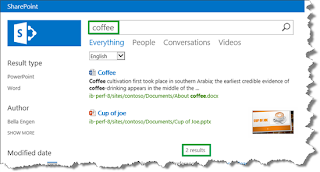
When you search for coffee, the Word document is returned.
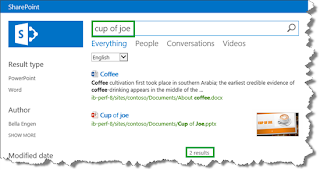
When you search for cup of joe, the PowerPoint document is returned.

For both documents to be returned when you search for either coffee or cup of joe, you can create a thesaurus. Here’s how you do that:
 
 
How to create a thesaurus
  1. Open a text editor, for example Notepad.
  2. In the text editor, enter the columns of your thesaurus: KeySynonymLanguage
  3. Use commas to separate the words.
  1. On a new line in the text editor, enter a term or a phrase, a synonym for that term or phrase and a two letter language code. Use commas to separate the phrases, for example Coffee,Cup of Joe,en

    This means that when users search for “Coffee”, search results for both “Coffee” and “Cup of Joe” will be returned. 
    1. Repeat step 3, but switch the order of Key and Synonym.
    This means that when users search for “Cup of Joe,” search results for both “Cup of Joe” and “Coffee” will be returned. 
    1. Save the file as .csv with UTF-8 encoding.
    Now that you have created your thesaurus, the next step is to import it to SharePoint Server 2013. Here’s how you do this:
     
     
    How to import a thesaurus
    NOTE: To import a thesaurus, you have to be a Search service application administrator
    1. On the server where SharePoint Server 2013 is installed, open a SharePoint 2013 Management Shell.


    1. At the command prompt, enter the following command:

      $searchApp = Get-SPEnterpriseSearchServiceApplication 
      Import-SPEnterpriseSearchThesaurus -SearchApplication $searchApp -Filename <Path>

      where <Path> is the UNC path of your thesaurus file.
    That's it!
     
    IMPORTANT: When you import a thesaurus, the existing thesaurus will be overwritten. If you want to add new phrases to your thesaurus, you should add them to the thesaurus file you’ve already imported. You can’t export a thesaurus file, so you should maintain your thesaurus file in an external system, for example on a file share. 
     
    To check that your thesaurus is working the way you want it to, search for your phrases from the thesaurus. In the example scenario, two files were returned for both “coffee” and “cup of joe.”


    Additional Information:

    Enable Developer Dashboard in SharePoint 2013

    By default developer dash board will not be enabled in SharePoint 2013. We can use PowerShell commands to enable or disable developer dashboard.

    To enable the developer dashboard we have to run following commands in SharePoint Management Shell.
    $contentService = ([Microsoft.SharePoint.Administration.SPWebService]::ContentService)
    $dashBoardSetting = $contentService.DeveloperDashboardSettings
    $dashBoardSetting.DisplayLevel = [Microsoft.SharePoint.Administration.SPDeveloperDashboardLevel]::
    On
    $dashBoardSetting.Update()
    In the above commands we are getting Content service from SharePoint administration service. Get the app service from content service developer dashboard settings and Make developer dash board display settings "ON" by updating the commands.
    After enabling the developer settings we can see an icon, on top right side of the page as shown the image below.

    By clicking on the image we can see new tab for developer dashboard as shown in the image below.
    My making "Off" we can disable developer dashboard as shown the commands below.

    $contentService = ([Microsoft.SharePoint.Administration.SPWebService]::ContentService)
    $dashBoardSetting = $contentService.DeveloperDashboardSettings
    $dashBoardSetting.DisplayLevel = [Microsoft.SharePoint.Administration.SPDeveloperDashboardLevel]::
    Off
    $dashBoardSetting.Update()  

    An 18-Minute Plan for Managing Your Day

    Reduce Your Stress in Two Minutes a Day

    Monday, November 25, 2013

    Customizing Search Refiners in SharePoint 2010

    Add some custom refiners to each of the custom search result pages I’ve been working on in a project. The steps to do this aren’t complex, but since I needed to read a bunch of posts out there to get it just right, I figured I’d write it up.

    Create Custom Managed Properties

    Only Managed Properties are available for use as refiners. While Site Columns automatically become Crawled Properties, they must be added as Managed Properties to use them as refiners (or in scopes, etc.).
    To do this, we go to Central Administration -> Application Management -> Manage Service Applications -> Search Service Application -> Metadata Properties and whatever new Managed Properties we need.
    Note that we cannot use the existing ContentType Managed Property in the refiners. If we do, we get the error
    Property doesn’t exist or is used in a manner inconsistent with schema settings.
    In order to use the Content Type as a refiner, we must create our own Managed Property which mirrors the existing one. I created a new Managed Property called ContentTypeRefiner and mapped it to ows_ContentType(Text).

    Perform a Full Crawl

    After creating the Custom Managed Properties, we must do a full crawl so that the new Managed Properties will be in the active index.
    To do this, we go to Central Administration -> Application Management -> Manage Service Applications -> Search Service Application [you may have named this differently when you created it] -> Content Sources. From the dropdown for the relevant Search Scope, choose Start Full Crawl.
    A full crawl can take a significant amount of time depending on the amount of content you may have, so it’s best to create all of the new Managed Properties before kicking one off.

    Add Managed Properties into Refiners

    To add the new Managed Properties as refiners in the custom search results pages, we do the following:
    • Navigate to the search results page
    • Go into Edit Mode
    • In the Refinement Panel (left side of the page) select Edit Web Part
    • In the Tool Pane, under the Refinement section, edit the Filter Category Definition XML to include the new refiners
    • Uncheck the Use Default Configuration box, otherwise your changes will disappear!
    Note that any of the existing refiners can be removed. The order in which the refiners are included in the Filter Category Definition determines the order in which the refiners are shown, if there is enough content which contains that refiner’s metadata.
    Here’s an example of what the XML for your own refiners might look like. This is the XML I added for the ContentTypeRefiner Managed Property. Most of the attributes are pretty self-explanatory.
    1<Category Title="Content Type"
    2  Description="Type of resource"
    3  Type="Microsoft.Office.Server.Search.WebControls.ManagedPropertyFilterGenerator"
    4  MetadataThreshold="5"
    5  NumberOfFiltersToDisplay="4"
    6  MaxNumberOfFilters="20"
    7  SortBy="Frequency"
    8  SortByForMoreFilters="Name"
    9  SortDirection="Descending"
    10  SortDirectionForMoreFilters="Ascending"
    11  ShowMoreLink="True"
    12  MappedProperty="ContentTypeRefiner"
    13  MoreLinkText="show more"
    14  LessLinkText="show fewer" />